Project Status: WIP
Fripuck is currently under active development as part of my bachelor thesis. I am aiming to have a fully working prototype ready by December, followed by a phase of testing and polishing with students from February to June. If you’re curious about the day-to-day progress, you can take a peek at my live task tracker.
What is the e-puck2?
Before diving into Fripuck, it helps to understand the hardware it runs on. The e-puck is an educational robot designed to help generations of students learn about embedded systems and robotics. Originally developed at EPFL in 2004 with a new version released in 2018, these robots are now built and maintained by GCtronic. Essentially, they are small, mobile robots packed with sensors that serve as the perfect sandbox for university students taking their first steps into mobile robotics.

Why Fripuck?
Fripuck2 is my re-implementation of the original e-puck2 firmware and API. The idea for this project was born out of a few frustrations I had while working with the robots during my own courses. The existing software focused heavily on real-time control, which made data analysis tricky, and the Python API relied on blocking calls that made the robot feel unresponsive. Plus, I really wanted an excuse to dive into embedded development!
Developed with the supervision of the Human-IST institute at the University of Fribourg and the help of GCtronic, Fripuck focuses on four core improvements:
- Data Analysis: Enabling the firmware to batch and send multiple data points at once, giving students higher time-resolution data to analyze.
- Robust Networking: Handling connection drops gracefully, which is essential when a dozen students are testing their robots on the same Wi-Fi network.
- Asynchronous API: Moving data transmission to a background thread so that the user’s code isn’t constantly hanging while waiting for network responses.
- On-board Robotics: Embedding a scripting language directly on the robot to allow for autonomous behaviors without relying entirely on remote control.
System Architecture
Under the hood, Fripuck is actually the combination of three distinct pieces of software: the main controller firmware, the radio firmware, and the client API. To keep things consistent, I am using FreeRTOS across both embedded chips, managed and built using PlatformIO.
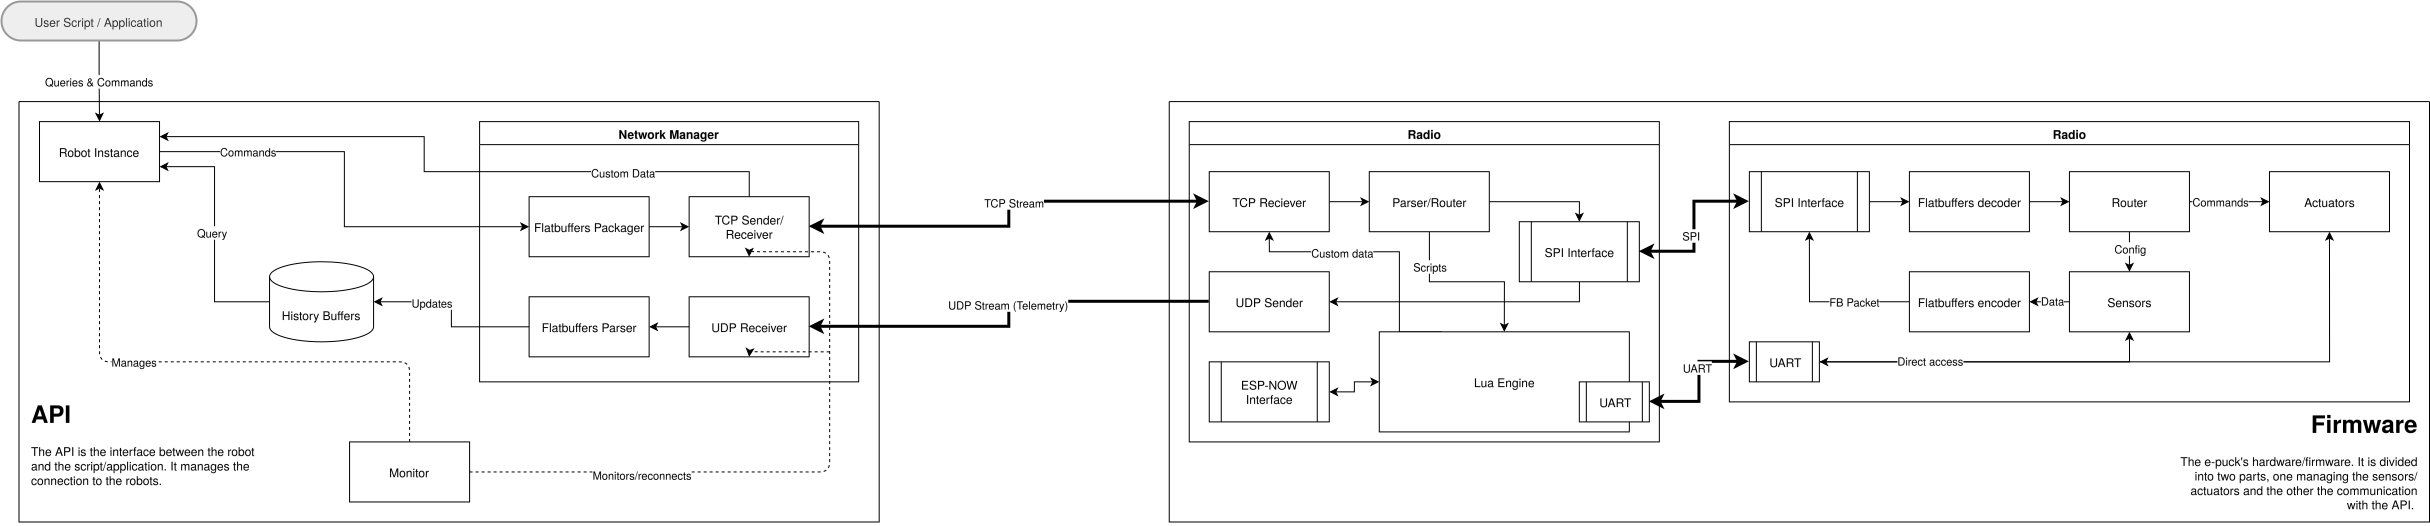
The e-puck2 hardware relies on a two-chip architecture:
- STM32F4 (Main Controller): This chip manages the physical actuators (motors), reads the low-level sensors, and passes all that telemetry data over an internal bus.
- ESP32 (Radio & Logic): This chip handles the Wi-Fi communication with the student’s laptop and runs the on-board Lua VM.
Telemetry with FlatBuffers
To serialize data between the robot and the API efficiently, Fripuck uses FlatBuffers with a static emitter1 instead of a custom protocol, which makes batching multiple sensor reads together straightforward and at a low performance cost.
Using FlatBuffers also enables any third party to write their own API based on the auto-generated bindings created by the FlatBuffers generator based on the .fbs schema provided by the project, making it easier to adapt to people’s needs.
Embedded Lua VM
A big addition to Fripuck is the Lua Virtual Machine running on the ESP32. While remote controlling the robot via the Python API is still the primary way students will interact with it, the Lua VM opens up a whole new layer of experimentation.
Beyond providing low-latency reactions, the VM acts as a tool for students to explore the tradeoffs between on-device and off-device computation. It allows them to investigate network latency and figure out how to make disjointed systems work together. For example, if the robot loses its Wi-Fi connection, it shouldn’t just crash or drive endlessly into a wall: students can write local Lua scripts to handle these dropouts gracefully.
The VM uses an update loop (similar to game engines) running at about 20Hz, combined with hooks for events like sensor triggers or incoming remote commands.
Note that if on-board programming is your main target, I suggest looking into the MicroPython firmware GCtronic developed themselves[cite: 2]. It will probably fit your needs better than a random bachelor thesis written by a single guy. 😉
Wrapping up
This project has been a great learning experience. Right now I don’t know if the project will survive the restructuring of the robotics course that is planned in the upcoming years, but nonetheless it was a very educational experience working on such a large hardware project.
If I ever had to come back to the project, I think I would have changed a few things, like changing FreeRTOS and PlatformIO for Zephyr and CMake, which seem to be standard in the industry, and would have provided much more unified code than it currently is. From a project management perspective, I think it would also have been better to reduce the scope of the project from the start, and make it larger over time only once the architecture is fully in place.
Overall, I had (and still have!) a lot of fun developing this, and I hope you (or the students) will also have fun using it!
By default FlatBuffers, or more specifically
flatcc, the C implementation of FlatBuffers, allocates memory on the heap, which is impractical in an embedded context.flatccallows using a custom emitter to build the buffers in static memory. ↩︎